Holy Moses! We finally finished phase one of our front yard landscaping project. We started this back on Mother's Day and now it's finished, the day before Father's Day. Kind of ironic.
The task was to tear out the front grass/weed area, place borders, install a drip irrigation system and create a pathway out of decomposed granite. Mission accomplished! We hired a crew to do the entire job and it cost us about $1200. $500 of it labor. I'm very happy I didn't do all the back breaking work myself but I was frustrated with the amount of micro-managing I had to do, much of it this week as I was prepping for Dave's birthday celebration/Father's Day weekend. Oh well, I guess you get what you pay for.
Turns out the crew had never laid down dg. In fact they didn't even know what it looked like. This was not revealed to me until the day before I needed to order it. Nice! So, I got my research cap on and learned a bit about dg. Just like any other project there are many ways to skin this cat. We had about 1000 square feet of area to cover. We ordered 6 cubic yards of dg to fill the space with a 2" height. I was told 2" is the minimum height you should have when working with the stuff. It compresses itself the more you lay it on.
Decomposed granite comes with or without stabilizer. I read about it online and then asked every person I got a quote from on the process and difference of using stabilizer vs not. Stabilizer helps the dg get compact and not erode away as fast. I was told without stabilizer you could end up refilling about every 6 months vs every few years with it. Stabilizer comes mixed in the dg or you can also get it in liquid form and it's sprayed on as the last coat. An alternative to liquid stabilizer is concrete powder. It can also be sprinkled as a top coat. One company told me they had a liquid stabilizer that become impermeable. That didn't seem like what I wanted.
The dg needs to be compressed as each inch of it is laid down. We used a sod roller to compress the dg. I was told to use a plate compressor. It would have a better effect. However, our crew wasn't very eager to use the plate compressor so we ordered a roller. Had we been doing a drive way or an area with a lot of traffic then we would have had to go with a compressor. Our soil is clay which is hard and compact to begin with. I conceded to what made the crew comfortable and hoped the job would be well done. Fortunately, it all turned out ok but I won't call upon this crew again. They kept stepping on the succulents and lavenders I recently planted! How can you call yourself a gardner/landscaper if you crush plants?
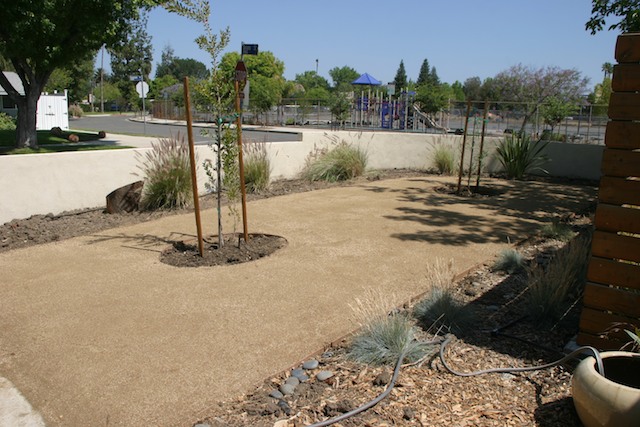
At least the job is finished and now I can get to phase two: filling in the perimeter with lovely drought tolerant plants. My irrigation is set and ready to go. Dave and I are over the moon! Our front yard is moving in the right direction and the house is looking less ghetto.
This is how the last transition went:
Weed barrier was laid down under the dg. I was told there is no need to if you lay down a good 3" of dg down. Plants can't grow through it.
I went with SoilDirect.com for the dg. They were the kindest, most informative and lowest priced of the 5 companies I called. I'll probably go with them again if I need any other landscaping materials.
The sod roller or lawn roller we used. It's a $15 daily rental at Home Depot. The crew was going to charge me $80 for the day!!! I know there's markups in this line of work but that's just crazy!
And now I need to start making the whole space much much greener! It's like much like a desert at the moment.
Labels: garden